
LiFePO4 Battery Troubleshooting: High Cell Voltage Alarms and SOC Not Reaching 100%
14 October 2026
Overview
If a LiFePO4 battery is throwing high cell voltage alarms and the state of charge never gets to 100%, it almost always comes down to one of two things: a single cell with reduced capacity, or a pack that is out of balance and needs more time to bring itself back into line. This guide walks you through two sets of readings, one at full charge and one at low voltage disconnect, that tell you which one you're dealing with.
This applies to any LiFePO4 battery with a BMS, from 12 V leisure batteries through to 48 V rack and wall batteries. Common symptoms are:
- High cell voltage alarm on the battery or inverter as the battery nears full
- Charging stops early and SOC sits below 100%
- One cell sitting noticeably higher than the rest at the top of charge
Work through the steps in order. Don't skip the discharge test, as the full-charge readings on their own can't tell a weak cell apart from a pack that just needs balancing.
What you'll need
- A way to see the individual cell voltages: either the battery's display, or the battery's app over Bluetooth
- Access to the inverter or charger settings, so you can turn charging off
- A way to load the battery down (normal house loads are fine, it just takes longer)
- The recording sheet at the bottom of this article (download the printable PDF), or a phone to photograph the display or screenshot the app
- A day or so: the full test needs one full charge followed by a discharge right down to disconnect
If there are multiple batteries in parallel, record each battery separately and label them (Battery 1, Battery 2 and so on) so we can tell which one is misbehaving.
Step 1: Take a full-charge snapshot
Once the battery has charged as far as it will go for the day (charging has stopped or the alarm has come on), check the battery's display or connect to its app via Bluetooth, and record what's going on.
- Find the cell voltages (on the display or in the app) and write down every cell voltage, cell 1 through to the last cell. A photo or screenshot of each screen is perfect.
- Record the overall pack voltage.
- Record the SOC % the battery is showing.
- Note which cell is the highest and which is the lowest, and the difference between them.
- Note any alarm codes or warnings showing on the battery or the inverter.
What you're looking for here is whether one cell is running away to the top (for example, cell 3 hits 3.65 V and stops charging while the rest are sitting lower). That on its own is fine and is the protection doing its job. It just tells us which cell to keep an eye on in Step 3.
Only take these readings at the top of charge (or at the bottom in Step 3). LiFePO4 voltage is very flat through the middle, so readings at 30% or 70% all look about the same and tell you nothing about balance. Where you can, take readings with little or no current flowing, and note the charge or load current at the time.
Use this as a rough guide for the gap between the highest and lowest cell:
| Spread at full charge | What it means |
|---|---|
| Under 20 mV | Healthy. The SOK BMS stops balancing below this |
| 20 to 150 mV | Out of balance. Normal while the balancer is working, keep an eye on it |
| Over 150 mV | Worry. Carry on to Steps 2 and 3 |
A wide spread right at the top while the balancer is working is less worrying than the same spread with the battery at rest.
Step 2: Check comms and who's controlling the charge
We need to know whether the battery is talking to the inverter and whether the battery's BMS is actually in charge of the charging, or whether the inverter is just charging to its own voltage settings.
- If the battery has a comms port, check the inverter shows it as connected over comms (CAN or RS485), with a live SOC reading coming from the battery.
- Check the inverter's battery type is set to the lithium or BMS option, not a lead acid or user-defined profile.
- Compare the SOC on the inverter with the SOC on the battery display or app. They should match.
- Note whether the charge current tapers off and stops when a cell gets high, or keeps pushing until the battery protects itself.
If there are no comms, or the inverter is running on fixed voltages, the battery can't tell the charger to back off and give the cells time to balance. Get that sorted first, then repeat Step 1 after a few days of normal cycling before moving on.
Also check the charge voltage hasn't been turned down to stop the alarm. Most LiFePO4 BMSs, SOK included, only start balancing at around 3.5 V per cell, and float voltage isn't high enough to trigger it. Capping a 48 V pack at something like 54 V is only about 3.375 V per cell, so the cells never get high enough to balance and the problem slowly gets worse. Full charge is 3.65 V per cell, which is 14.6 V on a 12 V (4 cell) battery and 58.4 V on a 48 V (16 cell) battery.
Step 3: Discharge to low voltage disconnect
This is the step that tells us whether a cell has lost capacity. Start from a full charge, straight after taking your Step 1 readings.
- Turn off all charging: solar, generator and grid charging. The battery should only be discharging from here.
- Run normal loads (or add some) and let the battery discharge until it hits low voltage disconnect and switches itself off. On most LiFePO4 batteries that's when a cell gets down to around 2.6 V.
- As soon as it disconnects (or just before, as some batteries switch their display and Bluetooth off when they disconnect), check the cell voltages on the display or app and record every one again.
- Record the pack voltage and note which cell is the lowest.
- Turn charging back on and let the battery recharge normally.
Keep the load light near the end if you can. A cell with high internal resistance can sag under a heavy load and look weaker than it really is, so write down roughly what load was running when it disconnected.
Don't leave the battery sitting flat after this test. Get charging back on as soon as your readings are done.
Step 4: Read the results
Line up the two sets of readings. The cell that hits low voltage disconnect first is the one that tells you what's going on.
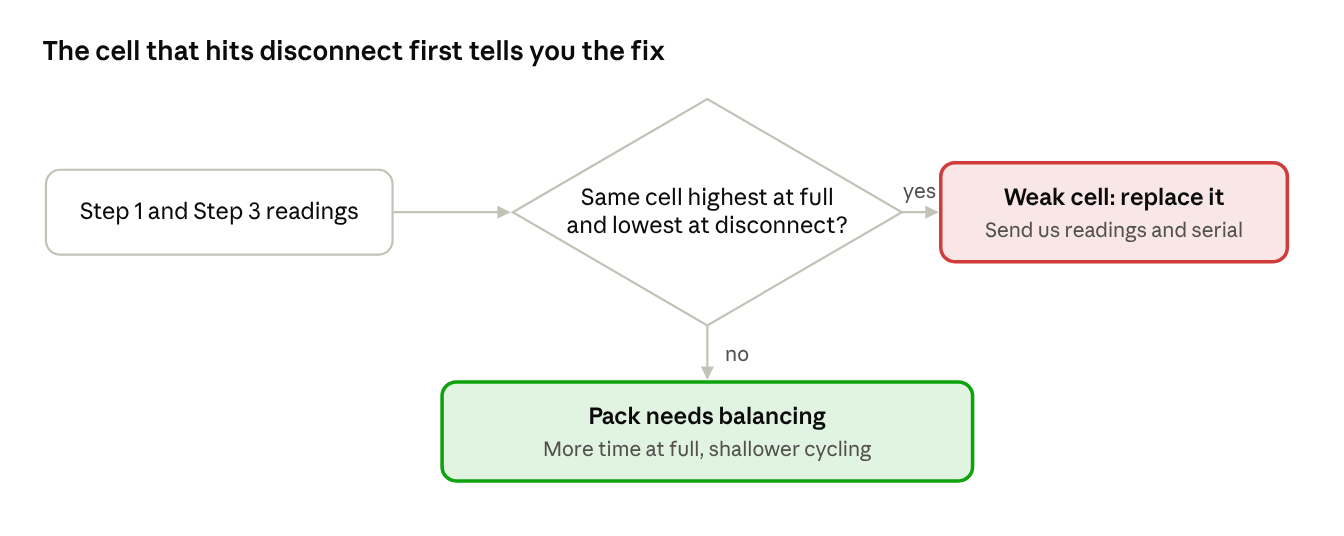
Suspect cell. Say cell 3 hit 3.65 V first at full charge, and cell 3 is also the first to drop to around 2.6 V at disconnect. That cell is full first and empty first, which means it holds less energy than the others. It has lost capacity and needs replacing.
Needs balancing. Say cell 3 was highest at full charge, but a different cell (say cell 9) was the one that dropped first at disconnect. That's not a capacity problem, the cells are just sitting at different levels. The pack needs more balancing time to bring them back into line.
Why packs drift out of balance
Every cell has a slightly different internal resistance (impedance), so each one charges and discharges at a slightly different rate. That means a pack is always drifting a little, and the BMS has to keep balancing it to pull the cells back into line. Balancing mostly happens near the top of charge, so the battery needs to spend some time up there each day for it to work.
Three things make it harder for the balancing to keep up:
- Deep cycling. The deeper the battery is discharged and charged each day, the more the cells drift apart, and the more balancing is needed to bring them back.
- Winter. Shorter days mean less solar, so the battery often doesn't reach full or doesn't sit there long enough to balance.
- Not enough time at the top. If charging stops the moment one cell hits its limit, the others never get the chance to catch up.
The good news is it adds up over time. With shallow daily cycling, a little bit of balancing each day brings the cells nicely into line. With deep daily cycling, each day brings in a bit more drift, so the pack needs more time at full charge to balance that out.
While a pack is balancing, it's normal to see the battery dip in and out of protection, the charge current jump around and SOC sit just short of 100%. Balancing is slow and can take several days, so give it time before calling it a fault.
What to do next
Same cell is highest at full and lowest at disconnect (suspect cell). That cell has lost capacity and needs replacing. Send us your full-charge and disconnect readings, the battery serial number and photos or screenshots of the cell voltages, and we'll sort the replacement from there.
Different cells at each end (pack needs balancing). The cells are fine, they just need more time to balance. To give them that time:
- Make sure comms are working and the battery is controlling the charge (Step 2)
- Let the battery reach full charge and sit there for as long as possible on sunny days, or use grid or generator charging to get it to full
- Ease off the depth of discharge for a while by raising the inverter's minimum SOC, especially through winter
- Repeat the Step 1 readings after a week or two. The gap between the highest and lowest cell at full charge should be shrinking
Stubborn packs. If normal cycling isn't fixing it:
- Hold it at the top. If one cell keeps tripping high voltage protection, charging stops and the balancer never gets its time. Where the charge settings can be adjusted, drop the charge current right down and hold the voltage just under the protection point (around 3.55 V per cell, 14.2 V on a 12 V battery, 56.8 V on a 48 V pack) so it can sit there and balance.
- Schedule a monthly full charge in winter. If the customer has grid or generator backup, set a scheduled charge to 100% once a month so the pack gets a proper balance even when the sun's not playing ball.
- Isolate the lagging battery in a parallel bank. Disconnect the batteries with higher SOC (power and comms), let the low one charge and balance on its own, then reconnect them all.
If the gap isn't shrinking after a couple of weeks of good charging, send us both sets of readings and we'll take a closer look.
Recording sheet
Fill in one sheet per battery, using as many cell rows as your battery has (4 for 12 V, 8 for 24 V, 16 for 48 V).
Download the recording sheet (PDF) to print and fill in by hand.
| Detail | Entry |
|---|---|
| Battery serial number | |
| Date and time at full charge | |
| Date and time at disconnect | |
| Comms working (yes / no) | |
| Battery controlling the charge (yes / no) |
| Cell | Full charge (V) | At disconnect (V) |
|---|---|---|
| 1 | ||
| 2 | ||
| 3 | ||
| 4 | ||
| 5 | ||
| 6 | ||
| 7 | ||
| 8 | ||
| 9 | ||
| 10 | ||
| 11 | ||
| 12 | ||
| 13 | ||
| 14 | ||
| 15 | ||
| 16 | ||
| Pack voltage | ||
| SOC % | ||
| Highest cell | ||
| Lowest cell | ||
| Alarms showing |
Sources
- Orion BMS: Weak Cell Faults (same top and bottom test used to flag low capacity cells)
- SOK Battery Unpacking and Initial Charging
- SOK Europe: Troubleshooting Guide SK12V100H
- Victron Community: BMS cell imbalance at 100% SOC
- Victron Community: Pylontech not balancing anymore
- Victron Community Archive: Pylontech UP2500 staying in absorption
- Power Forum: Balance Batteries
- Endless Sphere: Unbalanced
- 4x4 Community: Cell voltage difference
- Pedelecs forum: Li Ping LiFePO4 battery